Showing posts with label easter. Show all posts

Egging on Vintage Easter Decorating

A hoppy, slightly-early Easter to you, my friends! As a big fan of both Spring and pastels, I couldn't resist doing a small Easter display in my diningroom. That's a thrifted Shabby Chic table cloth I'm using as a mantle scarf at the moment.

I found this sugary-looking Easter sign at Marshall's several months ago and just had to snag it. It looks a bit like it's made of Peeps! (I suspect it would not be tasty, though. Sorry.)


Easter also gave me an excuse to bring out a few of my Hull vases. This one in particular has always had an eggly vibe, so there seemed no better time than now to feature it...


Here you can see the table itself. The pink tablecloth was thrifted. The placemats were off-season discount from Tuesday Morning. The candelabra was a thrifted find that I tarted up with some pearly pink paint, and the plates are mostly Hazel Atlas Platonite from the 50s.


Just one last shot so you can see the matching table and mantle together.


I hope those of you who are celebrating Easter have yourselves a memorable one filled with family, friends and food! And those who have other plans, may the weekend be a good one.

Of Peeps and Postcards: Thrifty Easter Fun

The grey of skies and the white of snow made some Easter decor I uncovered this week at Tuesday Morning seem all the brighter and pastellier! 

What I liked in particular about these finds are they all are straight from original Victorian postcards. Like this cute pair of chicks here brandishing colored egg bouquets...

Chicks just like these were mainstays on postcards from the early 1900s, and it's just as whimsical for me to see them hatched to life in 3-D here.
I have a number of cards like this in my collection but would hesitate to display them on my front door, which gets a lot of sunlight. This way, the good ol' cards stay preserved but the look is very authentic!

You can see a few of these cards up more closely. Here children ride on Easter eggs pulled by energetic donkeys...
Here, a boy and girl stand in a garden of garland, eggs and glitter.
And my favorite, this young lady rides in the stylish Ford Yolkmobile, which sports a dual-lamb engine.
And now, after that pun, I run sheepishly away until next post!

Crafting the Marshmallow PEEPS Carousel

Some people see sugary marshmallow chicks and think, "Look, dessert!" Me, I'm the sicko who thinks, "Hm, what I can glue them to?"

Actually, I'd been wanting to try my hand at making a cardboard Christmas village house, ever since I got my hands on some vintage-style cottages for the winter holidays. But when I realized there were extra Marshmallow Peeps lurking from last Easter's Peep Garland project just going to waste (er... curing) (click here if you'd missed that), ... well, the project took a suddenly Peeposterous turn.


"Why not build a cardboard carousel?" my brain mused. "In Easter colors! With Peeps Chicks instead of horses! And marshmallow rabbit onlookers?!"

(Yes, total suspension of disbelief is one of the primary rules for effective Peep crafting.)

The first step was to get the cardboard. This all involved stuff I would have thrown out otherwise-- the backs of used writing tablets, paper towel rolls, and parts of old boxes.


For the base, I made a pattern in Microsoft Word out of boxes-- a large square which would be the platform, surrounded by narrow rectangles of equal size all around it, to bend down and give the platform dimension. I printed this out as my template, and traced it onto the cardboard. I made four of those, cutting a circle in the center of two of them, that would allow the paper towel roll to fit through snugly.

I painted and glittered each of these pieces separately, so that way the paint job would be a little more pristine-- especially since I'd wanted to use a lot of different colors. The paints were Folk Art acrylics, and the glitter was Martha Stewart brand from Michaels. I used Martha's glitter glue, too.


Here's a close-up of the tube, so you can see the carousel "mural." I'd glued and painted four egg-shaped "windows" onto the carousel center featuring roughly-painted Peeps scenes... Mainly because it made me laugh...


Next, I made the roof. This was rough, given I'm apparently dimensionally-impaired. And it actually took me several tries to figure out how to make flat cardboard fold into a four-sized peaked roof. You can see the pattern of the four triangles laid out here...


When I made the roof the first time, it was huge. Really, really big. Like, one big wind in Peepville would blow the whole carousel over and cause major lawsuits. So I had to make it about half the size I originally did. You can see the giant pyramid here...


Next I poked four holes into the top and bottom base boxes using a Phillips head screwdriver, and skewered one Peep each through a plastic drinking straw. (Got a whole pack for $1 in Easter colors at CVS.) Then I fitted each Peep-on-a-stick into place, and put a bit of craft glue around both the paper towel roll in the center (top and bottom) and around the end of each straw. Then I glued the top and bottom boxes onto the piece. I also glued the more modest-sized roof to the top roof box, and glued and glittered those together to be more seamless.

The pink trim was simply strips of box carboard peeled apart from each other to create that ribbed look, and then trimmed on the top with pinking shears. These were painted, glittered and cut to fit.
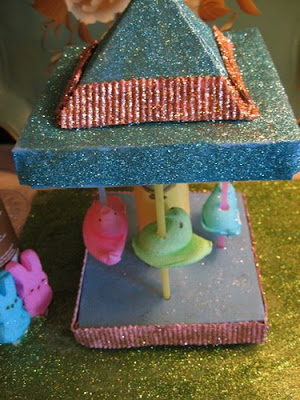


Each Peep was moved into carousel position by using a cotter pin to hold it in place while a dollop of glue dried to affix it permanently.


Lastly the carousel was affixed onto its "grass" glitter platform. That base is just some cardboard that came with a calendar, and glued onto a heavier box cardboard for more stability. It was painted, glittered, and the carousel was stuck to it...


A blue and a pink bunny Peep were added to the scene, waiting in line for the ride. (Why, may I ask, are the marshmallow rabbits called "Peeps," too? Ah, just one of the mysteries of life...)

Things I'd do differently if I did this again? I would make the entire piece rounded instead of square. Also, I really don't feel the structure would pass Peepville building codes; edges aren't as flush as I'd like, things don't sit quite as flat as I'd hoped, so I'd be more meticulous about how I cut my patterns.

All in all, though, it's a funny display for the house, and a great way for a little trash-t0-treasure fun at the Easter holiday. Hope you had fun during this magical moment of Peep entertainment!

For those of you who missed the post on my thrift-store-decorated work office, click here. Otherwise I hope you see you for this next Treasure Box Wednesday, when we uncover some orphaned saucers, some springy plates for $1 and I become reacquainted with a bowl like my mother's which I'd thought was lost to the sands o' time.

Thanks, as always, for being a part of it all! I just love that you folks stop by!

The Big Easter Lambie Whammy

Sheep happens.

It started with one planter, in a display cabinet at the Good Samaritan thrift store in North Versailles. The sheep's funny, smiling face and pink color cheered me instantly. I bought it and took it home.


The next time I visited the store, there were more sheep prancing on the shelves. In different styles and colors... All from around the 50s and 60s... And all in nursery room pinks and blues. I chose two. The nice lady behind the counter smiled as I presented my wooly friends for payment.


Over this last year, it seems more and more sheep have trailed back to my place-- like I was Mary of "Had a Little Lamb" fame, and these fine fellows were sure to go if I were. I have since become well-known at the Good Samaritan for my regular lamb procurement. I have rounded up sheep from the L&L Fleatique. I have shepherded them from the Salvation Army. I have gotten them by-hook-and-by-crook at Junk for Joy. But I hadn't quite realized just how many sheep there were until I opened my plastic tub of Easter goodies and let loose the flock.

So there are sheep on the mantle...

Sheep on the table...

Sheep carting eggs...

And sheep chaufferring chicks...


One year of thrifting, and I'm knee-deep in sheep!

And for folks who were asking how the varnished Marshmallow Peep garland fared from last year, I have to say, it's held up fairly nicely. The topcoat may have yellowed slightly, but the Peeps are all still in good shape and are currently decorating the mirror over the sheep-ladened mantle.


Next week, I hope to be finished with a brand new Peep Project I want to share with you-- one with a bit of a trash-t0-treasure spin. (No, really, it will all make sense when you finally see it...

Maybe... :)

Well, I'd probably best be off. With all this Easter decorating and sheep counting, I SERIOUSLY could use a nap. Hope you see you back here on the Blogspot for Treasure Box Wednesday. (If you missed last week's linens, lamps and lambs, click here.) And if not, then I do hope you'll be baaaaack again soon.

Decorating for Denial: Beating the Winter Doldrums

I don't mind struggling through drifts of snow. I can't feel the icy winds on my face. I'm blind to those grim, gray skies. And why?

Welcome to Winter Denial!-- Aloha! And surrounding yourself in an atmosphere of blissful winter ignorance can be quick and easy! Let me tell you how.

First: engage a dumptruck to pour one ton of clean sandbox sand in your front door. Spread it around to all your rooms. Mmmm... soft! (No, don't worry-- that expensive wall-to-wall carpeting will be just fine.)

Now purchase and strategically-arrange sunlamps-- one sunlamp per 3 square yards -- to give your living quarters that all-over Jamaican beach glow.

Next, engage two handsome lifeguards to patrol your beach and...

Okay-- yes, yes, I am kidding you. Don't call the dumptruck company just yet. (Though I'm starting to like that lifeguard idea...)

Still, today, I thought it would be fun to come up with a few more... er, realistic... ways to fight the Winter Blues and spread a little spring cheer around the house. Y'know, without causing our loved ones to engage a comfy spot for us in the local booby-hatch.

So how about:
  • Wafting a few fresh scents around the rooms? A tartwarmer or scented candle in a clean, fresh scent can do wonders to make a house seem inviting, and lift the spirits. I currently have a Yankee Candle Company "Country Linen" in my tartwarmer, but lilacs, lavender, and ocean breezes can help make the spring season feel like it's right around the corner, too.

  • Giving a nod toward spring colors a little early? Changing table cloths, place mats, or even place settings for a pastel or bold color scheme is a fun way to brighten up day-to-day living.

  • Bouncing a bit of mirrored light?-- Reflective objects help take advantage of the light we have in our homes, can make spaces seem more open. So things like little mirrors, lusterware, and shiny fabrics, might just do the trick to chase away those final days of winter darkness.


  • Investing in a few flowers? Whether it's an inexpensive fresh-cut bouquet or potted plant from the supermarket-- or even a snappy silk selection from Michael's-- flowers are a great reminder of warmer, brighter days. These were the cheery tulips I'd won as a result of the "Go! Smell the Flowers" blog's caption contest. It's been so nice to see bulb plants blooming inside while it snows outside.

  • Bringing outdoor items in? Gazing balls on small stands, mossy-look statuary, and tiny topiaries are all nice ways to make it feel outdoorsy inside. And no, I'm really NOT recommending that earlier sand-and-sunlamps scenario. I just figure when you like vintage, romantic decor, a few cleverly-placed tasteful garden ornaments do help carry on that quirky, spring feel.

  • Swapping in that spring wreath now? Say "Begone!" to red winter berries, pine and holly, and say "Ho-do!" to ivy, flowers, and whatever says "spring" to your taste. Will the neighbors wonder what's up? Hey, not as much as if you brought in that dumptruck of sand. Anyway, you're a confident decorator. You can handle it.

  • Picking up a few gardening magazines? Nothing like thinking ahead. Seeing all the horticultural eye-candy in gardening magazines, seed catalogues and your favorite outdoor coffeetable books really can warm the heart, can't it? Why not get excited about summer plans now?

  • Planning for Easter decor or craft projects? Due to the Retail Timewarp in stores like Target, Michaels and Wal-mart, Easter's been in full-swing since about... oh... New Year's. There are a number of cute and inexpensive items to create a cheerful Easter table. And it's not a bad idea to act fast, since those stores should be passing Easter and heading on to the Fourth of July any day now. Securing what you might want to use for this favorite of Spring holidays might just prevent regrets later. Plus, lookit the little chicks and bunnies!

Do you have any special things you do to say "hello" to the spring season? It would be great to hear from you about it!

And speaking of Easter craft projects, next Sunday, time permitting, I hope to share with you one rather amusing little craft piece I've been working on. I'll give you a hint as to what it might be: it's a sequel to last year's Peep Project. (Click here to read about THAT particular insanity in sugar form.)

Also, this coming Wednesday, we'll take a look at a few recently-discovered thrifted treasures. For one, you'll meet "Henry" and find out just what this talented septagenarian was able to do with a needle and thread. (If you missed last week's Treasure Box Wednesday feature and the Vignettes o' Thrift, click here.)

Until then, my friends, have some happy ones! I'm going to go grab the Yellow Pages and see if there are any Lifeguard Rental services out there. :)

The Peep Project

Is it a Busby Berkley musical starring Easter’s most popular marshmallow treats? No! they’re just celebrating The Peep Project.

It all started in the grocery store, when I noticed the Just Born company had come out with green Marshmallow Peeps-- PRECISELY the same spring green as my dining room.

My heart soared! It was just like the lyrics in that medieval song: “Green Peeps were my one desire... Green Peeps were my only joy...”

Okay, so, that was Greensleeves. But still. You get the picture.

And that picture initially involved decorative Peeps sitting as a centerpiece. But how to preserve them? I mean, we all know certain folks have a taste for stale Peeps (or as I’ve recently heard them described: “cured” or “aged”). But wouldn’t free-range Peeps on the dining room table attract other more... nefarious... creatures?...

So I decided to spray varnish the little sweeties.

Ya know, once you’ve made the decision to spray varnish marshmallow candy, you pretty much are on your way to full-fledged crafting. (Or the booby-hatch.) But crafting. We’ll go with crafting.

And that got me thinking that rather than Peeps in a Bowl, what I REALLY needed was Peep Garland for my dining room.

No, truly.

Here you see three of the green Peeps curing, hanging out for a week and wondering just what the heck is going on. They look a little nervous, don’t they?

They were spray varnished on all sides with approximately 5 coats of a clear polyurethane. Happily, we now know that spray varnish does not cause sugary substances like coated marshmallows to dissolve...

Otherwise it might have turned into the end scene of the “Wizard of Oz.”

Here you see the remaining Peep Squad preparing to be varnished, while two of the green Peep veterans stand by for moral support.

And then came the stringing! I punctured each Peep with a large hatpin (yes, crafting knows no mercy), just below the baseline of the head. This is critical. Because Peep Physics dictate that if there is the slightest inkling of top-heaviness, you will have garland with an entire flock of Peeps upside-down, and imitating Cirque de Soliel performers...

Mooning marshmallows do not say “Easter” to me.

When I strung them, I used two strands of clear plastic necklace thread, available in the craft store. I threaded it through on a large sewing needle, alternating Peeps and beads, along with three chocolate-looking egg ornaments I drilled through for threading. I finished it all off with some extra ribbon for flourish.

Here you see a close-up of the finished garland.


And here you see the doorway between my dining room and entryway, with the garland strung over it.

I had a few Peeps left over from this project. And since a pre-varnished Peep is a terrible thing to waste, I found myself using them, the remaining beads, some cut-up lace ribbon and a hanger to create this hilariously awful wreath...


I find it so aesthetically WRONG, well, naturally it’s hanging up on my kitchen door.

Oh--and before I go today, I will leave you with this: my kitchen shelf has been infiltrated with Beanie Peeps. I got them at Target. They were so cute, and so plush, they flapped their way into my heart and into my Easter decor.


Looking for even more Peep-related craft projects? Click here to take a ride on the Peeps Carousel. Otherwise, take care, dear Peeple-- er, people-- and I’ll see you next week.