Making the Faux Stained Glass Window -or- The Days of Hearts and Roses

Sometimes success lies less in the final destination, and more in the journey to get there. I think I can safely say this faux stained glass window project is a good example of the voyage being more prized than the ultimate arrival.

As readers of my earlier post might remember, I was hoping to create an inexpensive "stained glass look" window to hang in my kitchen and go along with my kaleidoscope of Fiesta dishes.

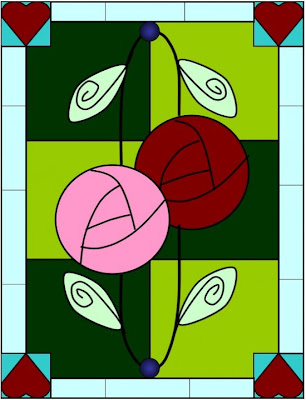
I was aiming for a sort of Arts & Crafts Period meets Alice in Wonderland feel. This was my initial design....
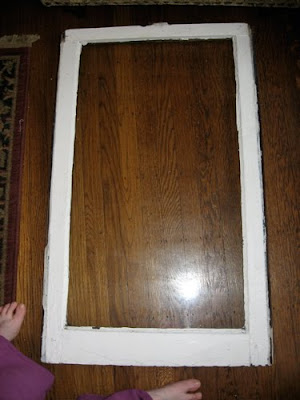
Using an old window I got at Construction Junction for $1.06, I added the pattern in stick-on leading I'd picked up discounted at Michaels a while ago...
The pattern progressed (if a little bit crooked here and there, but hey, it's Wonderland, it's allowed to be wonky)....
And finally, it was all transferred. Not perfect, but you can see where I was going with it, anyway.Now it came to filling it in. I used a couple of different types of glass paint, including Gallery Glass brand, made specifically for these sorts of windows. Unfortunately, the directions on how to go about it indicated "Follow the directions on the pattern." Y'know, the pattern I didn't have because I made my own pattern.

So initially, I was painting the color on with brushes. And that made things really streaky. In fact, you can't see just how streaky it was in this photo...
But here in the light-- yipes!
I liked how fluid the roses and hearts turned out, but that was a different type of glass paint, and that brand didn't come in the colors I needed. So I decided to try sallying forth by squeezing the paint on thickly-- as I did the hearts, the background paint, too.

I was a little like icing a very large, very cheerfully-colored, but very untasty cake...
And as it dried, the paint began to change color rather dramatically. I found myself just a bit mesmerized by the way it crept across the window from block to block getting darker... darker....
So now it hangs in my kitchen. I think it still could dry a little more-- it tends to smooth out slightly the more it's dry...
But the whole thing does have a rather textured appearance I hadn't planned on, anyway. Better than streaky, but not quite as placid and smooth as I'd hoped...
Still, it catches the light nicely...

I think in terms of Lessons Learned, I would experiment a little more with different types of glass paint, and understand their surprising behaviors, before embarking on a full-fledged project like this.

Anyway, I enjoyed the process. Honestly, what's nicer than a quiet weekend afternoon listening to a favorite film and surrounded by a whole rainbow of craftable colors?

May the rest of your week be shiny, too!

Watching Paint Dry

I know I'd told a few of you good folks who'd asked how the stained glass window project was going, that I'd have some photos for you of the finished project today.

I like to think that I am merely "Overly Optimistic" and not, in fact, "A Big Fat Liar." But I know that sort of thing can be subject to opinion.

Anyway, I expect to have that post up in a day or two. You see, I have been very, very busy.... watching paint dry.

It was enough to make me laugh, actually, as I was trying to focus on a movie, but my eyes kept darting to the stained glass project on the floor of that room. "I am literally watching paint dry. What is wrong with me?"

The way the glass paint works is it gets considerably darker as it dries. And it seems to creep from its edges to various inner sectors over the course of hours.

So here's been me for the last six hours: "Is it darker there? It's a little darker, I think. Should I try to stand it up and take pictures? No, it's not that dark, it could still run. Should I touch it? No, I'd put a big fingerprint in it. Is it ready now?.... now?.... NOW?!"

I was beginning to even annoy myself.

Of course, I'm sure the moment I turn my back on it, it'll be dry as a bone. It's like those watched pots. Can't trust any of 'em.

See you soon, friends! And (hopefully) with a shiny new project to share.

Treasure Box Wednesday: Thrifting, Stitching and Surprise

I'd caught a glimpse of the images as I'd passed the Red, White and Blue thrift store's hanging decor section. It was amid the art class paintings, the 70s mushroom plaques in plaster, dusty prints and framed posters. I got a sense of color, of intricacy, and, well... a lot of legs.

The section was crowded. I would have needed a cattle prod and more chutzpa than I certainly could ever summon, just to take a peek. I decided to pop back later, when the area was less... leggy.

So I bobbed and weaved around the store, and returned 20 minutes later to the spot, to find it much more managable. And that's when I got to see the first side of the three framed items that had been stacked and taped together.

The mermaid needlework had my attention immediately. Not only for its size, and color, but the fact that I knew how much work went into the thing...
At least a foot-and-a-half square, the design was chock full of mer-people...
...jellyfish, sunken ships and thready kelp.
On the other side was Rapunzel, letting her long hair down for the prince to make his grand entrance....

And this one had all the detail of the first... Castles and flowers and the great effort of the thing was remarkable to me...

I had no idea what the third one was (it was firmly taped inside facing the other two), but given it was in the same sort of frame and size, I expected it might be another Grimm tale. Perhaps Cinderella? Snow White? I looked forward to getting it home and finding out.

When I did, I was in for a big surprise. As it happened to be depicting my very favorite of childhood tales...

Alice in Wonderland.

What luck! And as you can see, the piece is as lush with detail as the other two...

Here's our friend the Hatter...
And even the Cheshire Cat makes an appearance. Albeit how much of him remains there at any time is up to him...
Moving on, at the Ohio River Boulevard antique mall, I found a Victorian luster portrait plate for just $6...
And at the Salvation Army on the South Side, I uncovered a McCoy pinecone patterned creamer (this had been a part of a tea set at one time), for just a few dollars...
It was a fun week of finds and very easy on the pocketbook in total... Perhaps this pocketbook...
Which was a whopping $1.50.

So that's Treasure Box Wednesday for this week. May you find your own delightful surprises, treasures, and perhaps even some Wonder in the days ahead.

No Stained Glass Left Behind

Well, I suppose it's not as bad as some addictions. I mean, the cops won't pull me over and book me for it. I'll never have to endure a cavity search because of it. And in one of those VH1 "Behind the Music" specials, it wouldn't pose much of a Dramatic Downfall.

Still, I do loves me stained glass windows. And I'm not afraid to have one hanging in every window in this house.

As you can see, I liked the arched stained glass panel I'd gotten so much, I'd invested in a slightly
larger one for my livingroom windowseat area. I'd had the pair of shield stained glass windows for years-- one in the center, and one propped in that tricky area I'd corrected recently in that boarded up area.

Now both shield windows are getting some light and, while they've only been up a few hours, it seems to me like they've lived there all along.

Of course, these were the easy ones. What's been an interesting challenge is the painted stained glass window I'm working on for my kitchen!

I was aiming for something to match my brightly colored Fiesta ware. Something streamlined, yet still having a period feel. Given the quirkiness of the dishes, and the fact I have a number of pottery heart molds hanging around, I decided to go with a Rennie MacIntosh (art and crafts period) meets Alice in Wonderland look.

This was my initial design...
I bought an old plain window at Construction Junction architectural salvage today...
(Mind the feet.)

You'll probably all get a chuckle when I tell you how much it set me back. Can you guess?

No?

Well, how about $1.07?

I know; I had to ask the cashier to repeat that myself. Now that's the kind of cost I like in a craft project-- especially one that's an experiment that may go awry.

I still had some stick-on leading from my previous projects. So I started mapping out my design. Here we just have the border...
Now for the start of the MacIntosh roses...
As the piece started to take shape, it also started to deviate a little from my original plan. Not a bad thing-- sometimes flexibility is what makes a craft have character. Here you'll see where I have it now... Most of it is mapped out...
Once I'm completely happy with the design, I'll begin to paint in the color. That's actually the part I've been really looking forward to! But, as you can see, it seems to be shaping up all right.

I think I might cut out a heart shape from paper and try to get those hearts more consistent. It's been challenging adding them by just eyeballing them.

Anyway, that's where it stands. I hope to update you folks with it as it comes to a conclusion. Even if it doesn't work out, we can get some chuckles from the mistakes.

And as always, thanks so much for stopping by and sharing in the fun!

Treasure Box Wednesday: Coming Up Roses

In my recent travels to Fiestaland, I did pick up a few goodies at the surrounding antique malls which I thought I'd share with you today.

From Pottery City, I got this rather unusual hand-painted, art nouveau style bust...
She's just plaster and probably isn't very old. I suspect she was someone's craft project, someone with an eye for detail who thought that what usually took on a uniform bronze cast would benefit from a bit of color and livening up...


I liked her because of the cheery pastel colors, her luster overcoat, and the careful painting of the piece. (Also because she was cheap!) So she lives in my blue sitting room very happily next to a vintage rose painting.

And speaking of roses, I couldn't resist this great vintage print of a lady in a garden, carrying a bushel of fresh flowers...The vibrant color caught my eye right away! It just felt like summer to me.

And lastly, at that same antique store in Columbiana, Ohio, I found these Fiesta (yeah, I know: surprise) candlesticks...
They were $10 for the pair. Which made me chuckle a bit, because apparently different grades of Fiesta-- condition, whether they're discontinued or not, maybe even manufacturing runs-- can cause pieces that seem to look virtually identical (at least to my untrained eye) shoot off into the skyrocketed-crazy price range. I mean, one vendor at Pottery City had a pair of orange candlesticks in this very same style-- possibly from the 30s-- for...

(Wait for it...

Are you sitting down?...

Good. Because you'll need to.)

That vendor had ones in this very same style for...

Over $900!

G-ah! Yes, yes, I know-- rarity, condition, blah, blah, blah-- but OH WOW.

And I've seen ones for $20, $30, and $80 as well. Just goes to show, it's very important to know what you want to pay for things, and stick to it. If I had $900 candlesticks, I think I'd never use them. I'd just put them in a clear glass box with a spotlight on them and charge for tours.

And is that really what Fiesta-- such usable dishware-- is about?

Field Trip!: Serving Up Style at the Fiesta Outlet

I had no idea it was so close. Yes, word on the street was-- or rather word from a fellow Fiesta fan was (because there's not as much discussion on the street about vintage style pottery as you might think)-- the Fiesta Retail Outlet was practically in my own backyard.

And sure enough, it turns out Newell, West Virginia-- home of the Homer Laughlin factory and birthplace of Fiestaware-- was just a hop, skip and a jump away from me. A jump and/or skip of around an hour.

Well, that's all I needed to hear. I've never had the chance to visit a place where things I actively collect are made. And Fiesta ware has enjoyed a long history of nifty art deco style.

So I called up my buddy Scoobie and asked her if she was up for a mini-roadtrip. I knew she'd had her eye on a couple of pieces of Fiesta in Tangerine to go along with some Grand Canyon printed dinnerware she already had. And my Fiesta information source had mentioned that not only was there a Fiesta Outlet there, but a "seconds" outlet. Where you could get pieces with minor flaws at discount...
It was music to the ears.

(Probably involving mariachis and maracas. We like to keep it themic.)

While Fiesta Drive, the location of the outlet, might not come up on Rand McNally directions, you really can't miss it in Newell, off Route 2...

Just head down the long driveway, past the warehouses, and along the river, in back...
There you'll find the outlet entrance...
A peek through the windows gives just a taste of the vibrant color that awaits you. Even on a grey, rainy day, it looks bright and cheerful...
Head to the front doors and pause at the "Brokenware Garden"...
Look, but don't touch! I was happy the snow we'd had piled up for weeks had melted away and I was able to see this little pottery patch...
Inside, there are two rooms. One, with brand new flaw-free pieces, factory-fresh. It's a mind-boggling variety of colors and styles to choose from. Pieces come in boxed sets and as individuals. And the prices are comparable to the rates department stores seemed to be charging for the same items.

Then, on the left-hand side of the shop is the Seconds Outlet. There, pallettes are simply stacked with the Fiesta pieces that the Homer Laughlin folks felt didn't quite measure up.

Some have minor run flaws... Some, the glaze might not be as thick as expected... Some may have chips or color issues or dimples. If you're not looking to collect Fiesta for it's resale value, you can find many pieces which are perfectly servicable and still have great looks.

The Fiesta folks supply sturdy milk crates in which to stack your selected pieces. And while the choice is limited to whatever pieces have been sent to Seconds with flaws, there really is a wide selection. Scoobie did, indeed, get her dream of Tangerine fulfilled with a lidded canister, some big coffee cups, a pitcher and a few other goodies.

I snagged some choice pieces myself-- largely things I knew I couldn't get in the stores around me.
If you visit the outlet and still have some energy, I'd suggest crossing the Newell Toll Bridge ($0.75 gets you there) and heading on over the bridge to East Liverpool, Ohio...
Just five minutes from Newell, East Liverpool is home to the Pottery City Antique Mall...

And there, you have four floors of treasures to peruse-- both pottery and non-pottery alike. My brain was still rather in Fiesta mode, so I picked up a few pieces of Fiesta that aren't a part of their current line...

Like these three fun and very art deco coffee mugs here at left...
From there, you're also not far from BeaverFalls/Chippewa, PA, which is home to Antiques Emporium, or-- northward-- Columbiana, Ohio, which has three different antique shops.

With this kind of grouping, it's more than worth the trip!

Well, I hope you all enjoyed our field trip today and that your virtual feet aren't too sore!


And if you have to be heading off, I hope you have a colorful and cheery week ahead of you.